Friday, September 2, 2022

GWS SlowStick Re Build Log, LiPO battery conversion


This is my recently renovated GWS Slow Stick, now sporting a Batman theme! Bought new in 2007, it flew only a few times, on 35MHz and puny NiMH, and crashed a little. It was still airworthy when I stored it in my garage. It had been fun, but over the years I'd moved on to other aircraft, even cannibalising the SlowStick’s ESC and servos. 

While clearing out recently, I 'found' it. Abandoned for 15 years, covered with dust and rust, it was filthy. The stab had separated from the bent and dented square section alloy fuselage. Steel wire undercarriage and pushrods were rusty, wheels jammed solid, one small tear in the wing, gummed up tape all over the leading and trailing edges and wing centre. For comparison with the refurbed plane above, here is how the standard stick model looks:

Searching the net for parts (there aren’t many here in the UK!) I saw a new old stock GWS ESC ICS-400Li 25A. This is for brushed motors and LiPO batteries - an unusual piece of electronics! So I decided to start with that, as after all, the geared conventional motor was hardly used. I believe that this is the GWS EPS-300C-D-BB motor, but I’m not certain of that. Perhaps a brushless motor could come later, but how good was the original motor?

A description follows of everything that I did to restore it (where I mention glue, it’s UHU Por unless stated otherwise):

  1. Using steel wool and 3 in 1 oil, remove rust from wire UC and tail wheel legs. Clean axles with Al-Ox paper, and ensure that the wheels are aligned and rotate smoothly.
  2. Remove rust from steel pushrods, ensure they move smoothly.

  3. Clean motor gears and very lightly grease.
  4. Remove the EP1180 prop, clean, inspect, balance and refit it. 
  5. Straighten alloy stick fuselage. Although it has a dent, I left it as is for now. If we have another urgent visit to Terra Firma, then I'll see about replacing it. 
  6. Remove the German Imperial cross stickers. Remove tape residue from wings, leading and trailing edge carbon rods and their alloy bent tube connectors. “Goo Gone” worked ok. Clean the whole wing, carbon rods and their connectors, stab and fin - microfibre cloth wet with soapy water, another microfibre with clean water, and finally kitchen paper towels to dry. Miraculous colour improvement! 
  7. Mend small tear at the wing centrefold with glue and Tesa white cloth tape. 

  8. Use red Sharpie to colour the bits of the wing where the top shiny red coating had come off. 
  9. Make a large card protractor for: 160 and 170 degrees (dihedral should be within those limits, i.e. 5-10 deg under each wing), and the R E control throws according to the GWS manual (35deg each way and 20-25deg each way respectively).

  10. Check angle of the alloy tubes and carbon rods with the protractor. They were at around 7deg and within the 5-10deg range. Left them as is. 
  11. Cut a 2mm blue foam canopy profile, to sit between the wing halves. Dry fit together, allowing three 50mm wide spaces at the LE, TE and through a slot in the depron foam. These are to allow tape to be run spanwise in these three places, and for wing rubber bands to cross.  
  12. Glue blue canopy profile and wing halves together with dihedral as per the spars, run tape through the 50mm spaces and slot. Canopy profile was a bit floppy, so I glued on some carbon capping strips that I had lying about to stiffen it a bit and provide detail. Glued on a foam Batman pilot to both sides of the canopy profile. 
  13. File a channel in the LE and TE foam, a cutout for the alloy joining tubes. Glue the carbon spars into the alloy joiners using 5min epoxy. After they set, glue and strategically tape them to the wing LE and TE. See this build info for details. 
  14. Tape chordwise both sides of canopy, through the slot in the canopy, and fore and aft of the canopy, overlapping LE and TE spars.
  15. Fin seems fairly secure, but not square. Apply a balsa triangle support piece with 5min epoxy, to keep it square and strong. 
  16. Glue a 30 x 1.5 mm balsa mounting plate (grain running spanwise) to stab. Then glue the mounting plate and stab to the alloy fuselage. Mounting plate improves both the joint and rigidity.  

  17. Red Sharpie marker over the balsa plate and touch up the LE of fin. Apply Batman stickers to wings and fin. I think the yellow and black logos look great on the red!
  18. Fit servos, ensure correct direction and mechanical centre. As I had some handy, used 9g Tower Pro SG92R digital, nylon with carbon fibre gears. These are 4.8V, not rated for 6V, but seem to be ok on a 5V ESC BEC. One was jittery so I replaced it with a good one. I noted that the horns had not been fitted with their pushrod holes directly above the hinge line. "Amateur me", back then! The horns were still fixed securely and the 3M Blenderm hinge tape was in great condition. For stability, add a couple of small fresh pieces of 3M Blenderm tape to the rudder hinge above and below the horn. 
  19. Cut out grey 6mm depron fuselage profile and glue to alloy fuselage stick. Glue small balsa blocks on each side of alloy fuselage, just behind the motor mount. Wrap soft 2mm foam sheet around the nose to form a cowl, using double sided foam tape to fix it to the balsa blocks. It was minimal and basic, just to give the impression of a Fokker Eindecker. Later I swapped this for a darker foam.
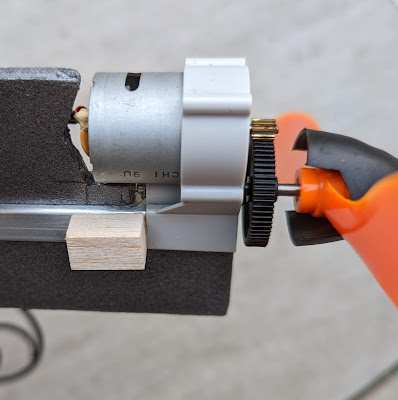
  20. Fit remainder of radio gear, including solder 2mm bullet plugs for motor to ESC, battery, Rx. Set control throws using the protractor. Set failsafe and throttle arm switch. In view of the horn placement, I had to program the throws to ensure the same amount of travel in each direction.

  21. Balance point was set to 100mm behind the leading edge. My thinking behind this is as follows. The instruction booklet says 105mm for the EPS-300C motor, which is what I think this is, and 95mm for the EPS-400, which was a more powerful unit. Previously, I had been flying this plane with NiMH batteries at 105mm without any issues. So as I’m now using LiPOs, I’ve moved it forward a bit, but not as much as 95mm. Hmm, let’s see how it goes - it’s just a starting point as they say. 
  22. With a 2S 1300 mAh LiPO battery, and balanced at 100mm from LE, it weighs 408g, which is the lower end of the range stated in the instruction manual (405g-440g).
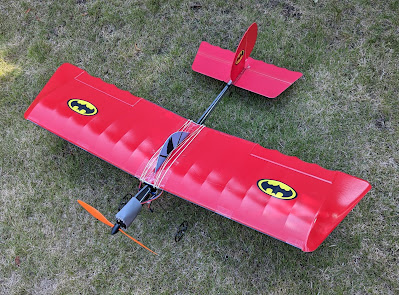

I waited for a day with little or no wind for the re-maiden. It needed a bit of down trim. I’m not yet sure whether the CoG needs to be moved forwards, or the thrust line needs altering, but in any case, it was a lot of fun, and SLOW! It loops really tightly, even from horizontal flight.

Tuesday, August 9, 2022

Durafly Tundra v2, fixing broken undercarriage

UNDERCARRIAGE REPAIR

The Durafly Tundra (here in v2) is an excellent trainer. Understandably, Hobbyking, the origin of these planes, generally has low stock as they keep selling out. However, the scarcity of replacement bits and spare parts is sad. 

I broke a small part of the plastic undercarriage bracket. Annoyingly, it did not happen during a flight or landing, but later at home. I was trying to straighten the wires a little, when "bang"! A message for me to learn: always remove the wire U/C parts from the plane BEFORE trying to straighten them! Here's a picture of the bit that broke and also my solution. A small piece of plate steel, shaped, drilled and bent a little. 


You may notice that it broke at the weakest spot, through the centre of the bolt hole. So I cut the remaining plastic square, to enable the new steel part to butt up to it. The steel is quite thin and I cut it out of an angle bracket from an old shelf. I used a small nylon washer for the bolt, to help press it down in view of the spring. Let's see how long this will last. Hopefully, long enough for Hobbyking to get more plastic brackets back in stock! Another photo below:


WHEEL IMPROVEMENT - BETTER ROLLING

Another simple thing that I think is worth doing is to put M3 nylon washers on both sides of each wheel, such as here:


And also on the other side of the axle under the retaining nut, here:


These two washers on each wheel make a massive difference to how smoothly the wheels roll. They also seem to help with how they react on impact - seem to be a bit more damage resistant. 

Happy flying all!

Friday, September 4, 2020

Flying a small glider off a High Start: Lulu wing on Crofter

The Peterborough Model Flying Club specify a high start for small gliders as 7.5m of rubber (they recommend 1/8" strip) attached to 22.5m of line. This works beautifully. Here are some details of mine. First, this is how I store it, on a 1cm thick Depron foam board stiffened with a piece of wood (a bit of old fencing!):


This works very well. Simply remove the split ring from the knob of Depron, fix it to the ground with a decent stake, and unwind the foam board as you walk back downwind. To put it away, start by putting the glider end split ring onto a Depron knob, then wind it up as you walk forward to the stake, making sure that the rubber goes on slack. Use a hand over hand movement, otherwise the line will twist.  Knots wise, I use a Palomar knot to tie the rubber to the stake ring, a Figure 8 (Flemish) bend to join rubber to line, and an Anchor Hitch to join the line to the ring at the glider end. I also add half hitches and overhand knots on top of these to prevent slippage. If the kite line at the Figure 8 bend cuts into the rubber, then I'll do something else, but so far, it's held up well.  

Following on from posts about the CROFTER, I had a 24" wing that was made by my son for a school project. It's based on the LULU wing, scaled down.  Here it is attached to the CROFTER fuselage:


If you look carefully, you can see that all I've done is add a couple of 1/16" tabs in front and behind the wing platform, before banding the wing on. It means that the band pegs are a bit awkward to reach, but it's not a big deal. 


No idea why my son went for a German/Belgian flag look with the tissue! 

Balanced at 49% of chord (90mm, so at 44mm behind the leading edge), all up flying weight was 36.7g. That means it's about 10% lighter than the CROFTER with roughly 20% more wing area. Wing loading hugely improved. 

A quick shoulder glide, showed it needed a 1/32" shim of up on the stab, and it had a slight right turn which I encouraged with an Al foil tape trim tab on the fin. Then on to the high start. First flight was over 1min. I had a go at trying to take videos myself, but it was pretty lousy trying to do it myself and launch. First a 4s clip of the end of the high start launch. 


Now a longer video of part of one of today's flights. It starts off doing right hand turns, but then goes downwind in a straightish glide before turning a little and landing. 


It's abundantly clear that the LULU wing on the CROFTER fuselage is far better than the original CROFTER wing. A tribute to John Barker, who originally designed the LULU. RIP Hepcat. 


Monday, August 31, 2020

Herr Starlite evening flying: Aerobatics with a R/E 3 channel model aircraft


The perfect plane for a calm evening. STARLITE is a well behaved, light, 3 channel model from SIG mfg, HERR. It was a pleasant kit to build. Mine came out at 160g all up weight ready to fly (balanced under the front half of the wing spar). It's fitted with a small brushless motor, 6A ESC, 450mAh 2s LiPo battery, EP5030 prop, and two 8.5g EMAX ES08AII servos. Here's a photo of them in position on my quick build servo mount:


I find these EMAX servos to be really good value for money - smooth, powerful, reliable and cheap. They are firmly at the budget end, and I don't think they centre as accurately as some others (in my tests, some Hitecs were better). But it's a tiny difference and I still like them. The pushrods are carbon rods bound with kevlar to wire at each end. You can't see the carbon rod in the photo above, but you can at the other end:

All designed by Herr to be light weight. And below, another photo of my Ferrari inspired wheels on the STARLITE'S somewhat spindly undercarriage: 


So, with a R/E plane what can you do in terms of aerobatics and manoeuvres? When you think about it, there's actually quite a lot - look under the photo below for a list. 
 

AEROBATICS & MANOEUVRES WITH 3 CHANNEL RC MODEL PLANE


DO-ABLE ON MOST R/E PLANES


  1. Circuits: left hand and right hand. 

  2. Procedure turns (to change circuit directions)

  3. Aerobatic 360ยบ (a wide circle turn in the horizontal plane)

  4. Steeply banked turns

  5. Chandelle/Wingover

  6. Figure of 8 (two 360ยบs, crossover point in front of pilot, entry and exit in the same direction)

  7. Inside Loop (a big standard loop, canopy on the inside, in the vertical plane)

  8. Humpty bump (entry and exit direction the same, no rolls)

  9. Hammerhead/stall turn (entry and exit in opposite directions)

  10. Lines: Vertical and 45ยบ, up and down

  11. Landing approach practice. Dead stick and/or low power. Over long grass or other unsuitable surface, bring the plane to under 6’ height, then power up and climb out.


WITH UNDERCARRIAGE OVER GOOD GROUND SURFACE 


  1. Touch and Gos (like landing approach practice above, but touch the wheels on the ground)

  2. Taxi practice, ground turns, figures of 8, alignment drills, etc. 


PERHAPS DO-ABLE ON SOME R/E PLANES?


  1. Outside Loop (canopy outside) 

  2. Spin (1x or 1.5x) 

  3. Barrel Roll

  4. Tailslide

  5. Loop to inverted. Exit with either: a dive (basically, a stretched loop); or a barrel roll out (e.g. a 'Barrelly' Immelmann turn/half Cuban 8 - it may not be easy to distinguish them!)

  6. Square Loop

  7. Inverted 360ยบ


Are there any more? Today I had a go at 1-9, 11, and 19 (a stretched loop). All went reasonably well except the stall turn, which ended up more like a prop hang. I need more finesse on the airspeed, but I've no doubt STARLITE will do it if given the right instructions. Also, on the Figure 8, I kept doing one turn bigger than the other. I haven't tried spinning, or barrel rolling STARLITE yet. 

Bags of fun. Flying always leaves me with memorable images. A major one today was STARLITE gliding slowly in the orange sunlight on deadstick landing approach practice. 

The only problem with autumn evenings is the dewey damp grass. Wrinkles up the tissue...

 
But it dries out and stretches back fine. 

Sunday, August 30, 2020

Flying wing maiden


Today I maidened this 900mm (35") span foam wing. It was easy to put together and flew beautifully. Basically, a maiden with no surprises or dramas whatsoever. All it needed was a bit of up trim (it always surprises me how high the elevons need to be centered on a wing). I have to experiment with CG - will probably move it a little forward first.  


The battery and receiver hatch is cut out of overhead projector slide (remember them?) covered with coloured parcel tape. All up weight ready to fly is 197g. It also has a tow hook for pinging it off high starts. The wire hook is attached to a ply bracing spar that is pushed into a slot in the wing. Here it is being glued in with white wood glue (pva resin type, which I find works well on foam). 


Details below of the hook and ply bracing spar. Kevlar thread bound on and sparingly smothered with superglue. Very strong. 

I'm wondering now whether to keep it as a glider, or add a pusher motor. It came with a geared brushed motor and huge looking prop. If I do put a motor on it, I'll probably go for a small brushless and 5mm dia shaft smaller prop (EP5030 should be ok, I reckon). 

I think I'll slope it first before deciding. I also have a 48" Genesis flying wing that also configured as a glider and it's great on the slope. 

Thursday, August 27, 2020

Crofter first flights


Evening hardly any wind, on the day I maidened the CROFTER 24" simple glider. I found it very hard to trim. Took me a long time to get it to tow on the High Start (30m), and the glide starts stally, then tends towards a spiral dive. 

I think the fin is too big, and have since cut it down. I've also experimented with moving CG forward to 40% (it was about 50% on the plan), but it didn't help very much. I may try to move CG backwards to about 55% and see if that helps. 

However, I now believe that this glider for a newbie would not be as satisfying to build and fly as compared with a simple well-designed model with tissue covered wing. 

So, to check that, my daughter has agreed to build a West Wings Merlin 35" wing span, which is a well regarded kit. We'll compare it with this one for ease of launching and trimming - and overall satisfaction. Not really a fair test though, because it has a bigger span and more complex construction.

But I also have a 24" wing that was built a few years ago by my son for a school competition. It's based on John Barker's famous LULU. Here it is after steaming, banded to a board to get a warp out:

I should be able to to fix this wing temporarily onto the CROFTER fuselage. It weighs 8.43g as compared with the CROFTER'S which is 12.3g - that's 30% lighter! It also has significantly more wing area (90mm chord vs. 75mm on the CROFTER, giving about 20% more area if my maths is right). I'll balance it at about 50% and see how it behaves. It will be an interesting experiment!

Newcomers need something that gives good results relatively easily, in my view.

Sunday, August 23, 2020

Crofter 24" simple glider: revisiting my first ever model plane

Most aeromodellers seem to have memories of one sort or another about the first plane they ever built. As advertised in a previous post, my first attempt was a Crofter glider by Ian Barret published in Aeromodeller in 1973.
 

As a boy, the build felt like I had slaved away for ages to produce a small glider. While I had a sense of satisfaction, trimming and launching it properly evaded me. I had no real support for that, and didn't know who to ask. This was obviously pre-internet. I was 11y old and although I managed to get it to release off a hand tow launch, the overwhelming feeling was of frustration. 

I've always wanted to revisit this model. With the benefit of some years of experience of full size gliding, building chuck gliders and many other models, construction this time round was really easy, taking me essentially one evening. The decoration and ballasting happened the next day. Here's a picture of the final model. 

Who doesn't like tissue flames?! Perhaps they signify my boyhood frustration with this thing! 

Today, I'm an experienced aeromodelling chappie and I see two main issues with this design. Let me start with the weight: 

Wing: 12.3g

Fuselage: 11.9g

Stab: 2.3g

Ballast and rubber bands: 13.9g!!

AUW ready to fly: 40.4g

The built weights of the wing, stab and fuselage are pretty good, but that is a massive amount of ballast required to achieve the plan-marked CG of 38mm behind LE. It indicates a heavy tail, a long lever arm, a short nose, a forward CG, or all of them! 

Not surprising then that first glides from the shoulder indicate to me a higher wing loading than even most of my chuckies! It's stable due to the CG and dihedral, but has to glide relatively fast compared to really lightweight tissue and balsa gliders. On the other hand, it seems to react well enough to the air, so it should thermal - that is if I can get it to launch and turn on the glide (without using auto-rudder and such). I've started with the tow hook a little bit further forward than indicated on the plan:

The second issue I see with the design, is the ease with which this wing can warp. Nothing wrong with a Jedelsky style wing (reminiscent of the Cloud Tramp rubber model, but also some really high performance free flight models of the past), but the Crofter's wing is not very "stable". Trimming becomes interesting, as one day it will turn left, and the next day right. This is purely because of the twistability of the wing design. It's like it has random ailerons! On the plus side, you can eyeball it quite easily, and steam changes in. Whether the changes stay in, only time will tell! But at least I know what I'm doing now with trimming, balance and warp changes. You can see a little stab shim in the photo above. If I had the trimming information guidance or sources as a kid, I think the model would have been a good teaching aid for aeroplane control surfaces. 

As I write this blog, I wait for good weather to maiden it on a small high start. It's gonna be fun! Whatever happens at the maiden, the catharsis of the build has been worthwhile already. Whether it zooms off to one side to crash sickeningly, or the wings fold in flames on its first high start launch, I've already tucked all that childhood frustration to bed. Basically, I understand what's happening and why at every step. That's such a good feeling. 


Google