Showing posts with label plans. Show all posts

Saturday, August 19, 2023

Classic balsa RCM Trainer Junior electric: Build Log and Flight reports

This is my scratch-built electric version of an iconic 1970s i.c. trainer - the Radio Control Modeler magazine (RCM) Trainer Junior. The article on this 52” span model appeared in the June 1974 edition and opened with the remarks: "Another reliable, good flying 60 becomes a reliable, good flying 40. An aerodynamic design that makes for slow, stable flying when you want it but, will loop, roll, spin, fly inverted, or…[sic]."


Introduction


Designed by Joe Bridi and Don Dewey, the RCM Trainer Junior became the “Trainer 20”, kitted out by Great Planes. As far as I can see, the Great Planes kit version differed in having a split elevator instead of one continuous sheet and framework to hold the wing dowels instead of solid balsa block. Both plans are available from the Outerzone website. These trainer type designs were ubiquitous and became a staple. I suppose the modern equivalent would be foam trainers, like the Durafly Tundra, E-Flite Timber, FMS Kingfisher, Max-Thrust Riot, etc, although of course, they are tail-draggers, as opposed to tricycle undercarriage. 


I was curious to see how an old-timer balsa trainer would compare to the modern stuff. Also, this would be my first tricycle undercarriage RC plane. With photos, I’ll show you the build, the mods I made and describe the first few flights.


Building the RCM Trainer Junior


Rather than messing about with pdf files, I conveniently obtained 2 copies of the 1974 original plan from eBay seller “mrhobby” in Maryland, USA. I left one plan intact, and used the other one. Thanks to mrhobby for continuing to help the modelling community. While I'm at it, thanks to folks at 4-Max UK, DuBro in the USA for very helpful email correspondence, and Balsaworkbench.com for some inspiration. I cut the plan into sections to fit on my building board. Adhesives were primarily aliphatic resin (EvoStik exterior), epoxy (Devcon 5min and Araldite precision) e.g. for the fin-fuselage joint, and just a little CA, e.g. thin Zap for Great Planes CA hinges, and on a few bits and pieces where CA made sense.  


Tail Feathers 


The elevator was solid balsa, as per the plan. To try to keep the tail end light, I departed from the plan and constructed a built-up fin, rudder and stabiliser.


You can just see the thin ply ‘biscuit’ brace to strengthen the centre joint. Why did I bother with this? Well, many experienced RC modellers told me that i.c. engine aeroplane designs require lots of nose weight when you convert them to electric, because the i.c. motor and tank are heavy compared to a modern brushless electric motor and LiPo. 


Fuselage


Fuselage construction followed, and my next mods to the plan were to change the second bulkhead to an open frame and add a ply bulkhead for the electric motor ahead of the one for the nosewheel steering mount (DuBro nylon for 5/32” (~4mm) wire).


For access, there is the hatch above. Underneath, I made another hatch out of 1/16” ply, eventually painted white and held on by 4 screws. That needed an egg-shaped cutout to allow for movement of the sprung nosewheel steering arm.

It is important to have the nosewheel steering arm spring centered on the bottom edge of its bulkhead. It's simple physics of moments and indeed, it is shown on the plan. That said, I can't count the number of times I've seen that spring dangling way below a model!


Wing


I used the pinhole method to make templates: hold the plan over a piece of card, use a pin to prick holes around the desired outline, e.g. the wing rib, then join the dots on the card, and cut out a template. I ended up using thinner ribs outboard and thicker ones inboard, just because my balsa sheet stock was limited.


Spars were 6mm bass wood, rather than balsa. Another departure from the plan was to angle slightly the thick innermost ribs on each wing half and then sand them for the dihedral joint. To me, this was easier than the additional wedge shaped centre rib and dowels shown in the plan.


To glue on the LE and TE, I used this technique with pole elastic and clothes pegs. It worked very well.

Similarly for the pine blocks in the middle and pins for the tips.

As you can see, I also made wing servo mounts, for individual wing servos. I think this is more modern and easier than the torque rod single servo setup.


It means short control rods externally, but that itself is useful when it comes to setup and adjustment. Further, it gives me the option of programming differential or flaperon.


The plan specifies wing dihedral as 1 ¼” (32mm) under each tip rib. When joining the wings, I reduced this to 20mm and added short ply braces across the central joint. Generally, I had kept an eye on the weight of each wing half as I built it and chose materials to keep them balanced. This was very useful because at the end all I had to do was adjust my choice of sheeting balsa to even out the lateral wing balance - no balancing weights were required! As per the plan, after sheeting, I applied glass cloth over the centre joint.  


Undercarriage


In addition to the wire sprung nosewheel described above, I made the undercarriage legs out of aluminium sheet and longer than the plan, as I needed clearance for a 12” prop that suited the recommended electric motor (advice from 4-Max). Since it is not “Dural” and therefore prone to bending, I decided to also add suspension: a central binding eyelet, springs and wire connecting rods. 


Servo Mounts and Connections


I added the rudder snake outer at this stage, but here I made a mistake: I built all the fuselage servo mountings at this point - Rudder (snake), Elevator (pushrod) and Nosewheel (pushrod). This eagerness bit me later on, as I’ll explain below in the sections CG and Balancing, and Radio Installation. 


Covering


The obligatory naked model photo:


For the Oracover covering scheme, I deliberated for quite a while. My aims were to show off the framework in the tail feathers and wing, aid in visibility - distinguish underside from top and model heading forwards or backwards - and to look nice!


Underside is all white except for some red stripes (see photo in the Undercarriage section). I allowed myself a single stripe of black trim, and a couple of side panel stickers. I applied thin white foam around the inside of the motor bay to clean up the look and perhaps provide some sound damping. The hardest parts to cover were the front corners of the wing. I could not get them wrinkle free. It was awkward because I was using one sheet for the main bay and tip. I suppose I could cut off the film from the outside edge of the last rib to the tip, and try to stick on new smaller sections without wrinkles, but I’ll leave that as a rainy day task.


CG and Balancing


To my total irritation, it came out nose heavy. I guess the motor is pretty chunky and far forward. As I’d built the servo mounts, pushrods and fitted the snake already, I couldn’t easily move the battery back enough to balance it out. And even if I’d ripped out all the servo mounts and moved the battery back, it would have been very awkward in use as I’d need to take the wing off to change battery. So, having considered all the options, I moved the battery back as far as I could while still being able to access it from the main hatch and added tail weight. Generally, I prefer not to add tail weight, but here, the convenience won out. I fixed lead buttons (for curtains) inside the rear of the fuselage, which I reinforced. I also added a tail skid, which would save the elevator in an awkward tail-down landing.

Altogether, I added about 35g to the rear. So, I would have been ok building solid balsa tail feathers after all!


Radio Installation


Here are photos of the fuselage-mounted servos and receiver. First, a top plan view, looking right and finally looking left:


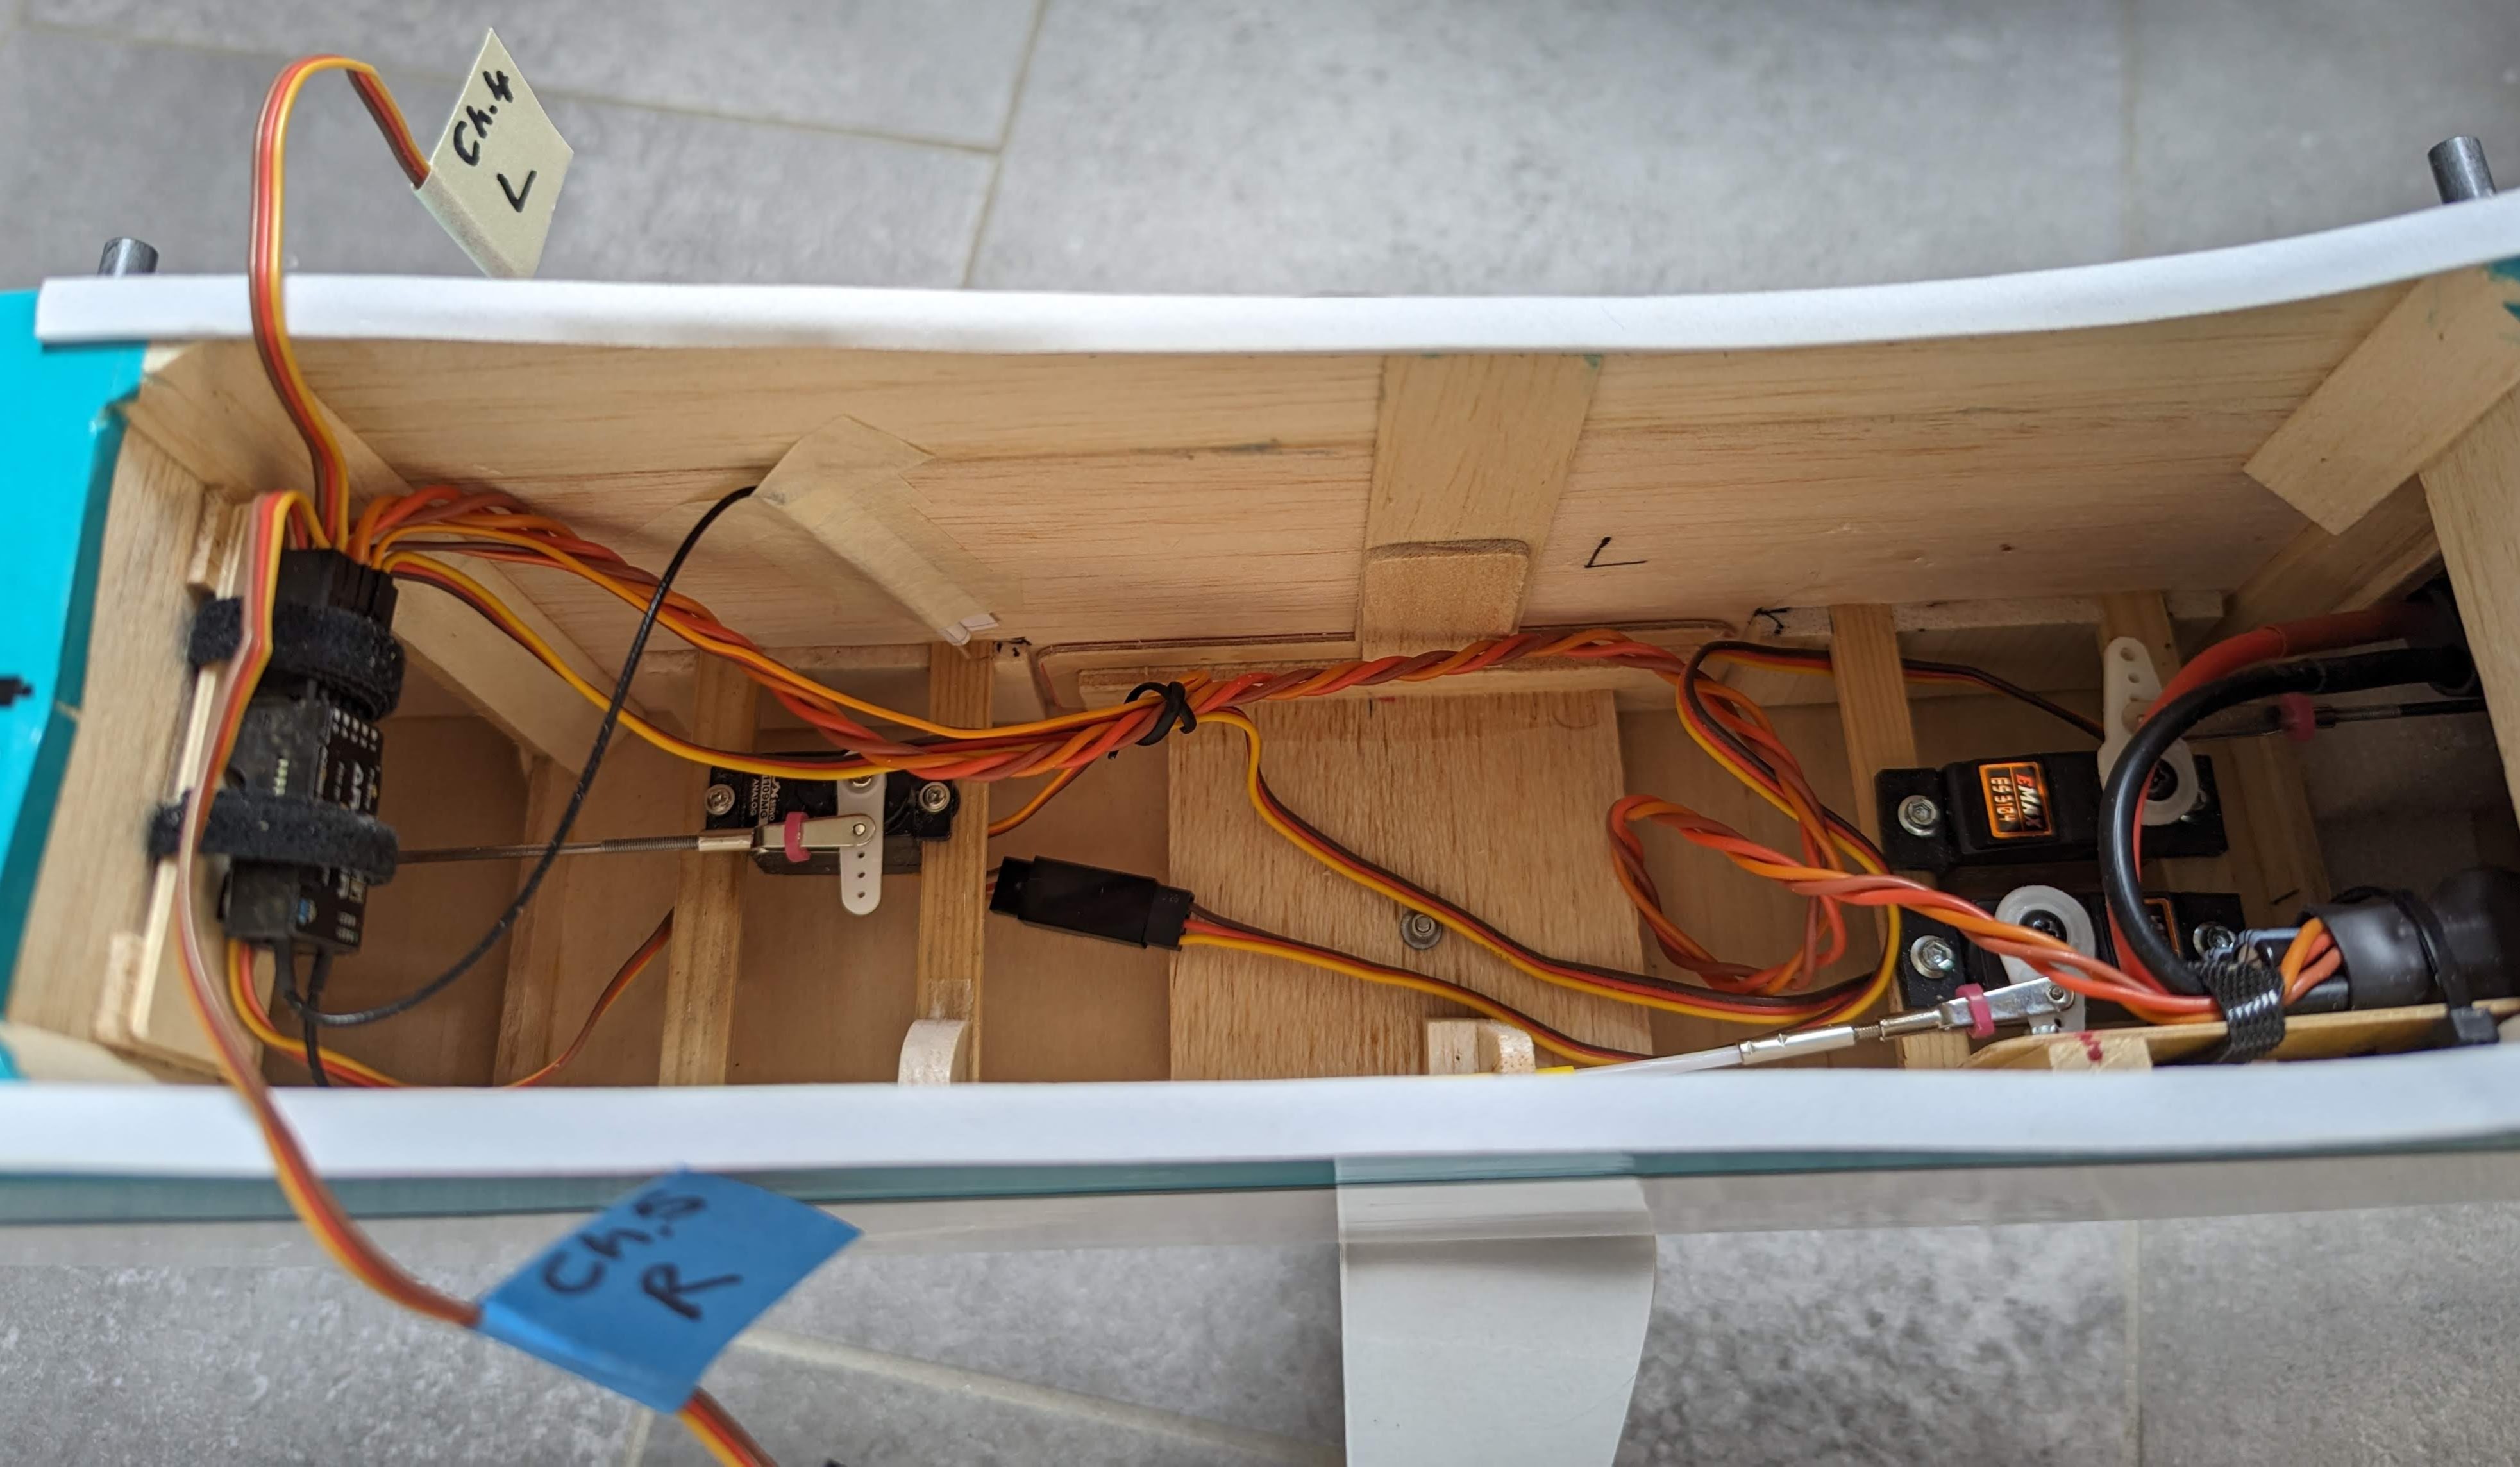
The best bits are the paper tubes that allow me to orient and fix the antennae tips at 90° to each other. They help to ensure that the working tip portions of the antennae are kept straight. As a reminder, in 2.4GHz kit, the strongest connection between transmitter and receiver antennae is when they are parallel to each other. I made the paper tube by rolling thin paper over a cocktail stick (using squared paper helps with alignment), and gluing the long edge with pva adhesive. Leave some paper over as a flap, to help with mounting. I mounted the tubes with paper masking tape, in case I need to reposition things after experimenting.


What’s it like to fly?


It was a lovely day for the maiden, sunshine and 7mph wind. With the CG at the forward end of the range on the plan, transmitter on low rates, I did all my checks. Nerves mounting, the take off was exciting and easy! I just moved the throttle open, picked up speed and lifted her off! She seemed nicely balanced fore-aft and laterally, just two clicks of down trim required. Changing the throttle setting, I was surprised that I didn't feel the need for any thrust line or balance changes. She glides really well, can fly slowly - so wing loading must be low - and there is loads of power available if I need it. A slightly bumpy landing - because I didn’t align for the cross wind very well and didn’t hold off properly. Plane was fine, except that the right undercarriage leg had straightened a bit, making the right side sit low. Decided to stop there, quit while I was ahead and return another day! The colours were magic for orientation and my wife said it looked great in the air. Very satisfying. 

At home, I removed the alloy undercarriage, straightened it and refixed it with a slightly longer and wider central spring anchor. I also changed the springs to much stronger ones. This may help to prevent it deforming on a heavy landing. I found myself wondering what she would fly like on mid rates!


A few weeks later, I flew again and discovered the answer: the plane feels fabulous on mid and high rates - simply brilliant. I tried some aerobatics: inside loops, Immelman turns, humpty bumps, rolls, reverse shark tooth, cuban eight. I could hold inverted too. I tried a spin, but wasn’t sure if what ensued was a spiral dive, although it looked pretty. I have not yet tried outside loops. It was so much fun to fly, and I nailed these landings, properly lining up and holding-off for a gentle touchdown.  


After just a few flights, I love this plane. It’s not as “flippy” as the modern foam trainers mentioned above. To explain further what I mean, consider the BMFA ‘figure of eight’ manoeuvre that is used in the A and B tests. This should be thought of as two level 360° circles, not a squashed 8. Compared to a modern foam trainer, the Trainer Jr was much easier to control during this - I found it easier to adjust the bank, turn radius and height. I’d imagine that the unmodified original, with its greater wing dihedral, would be even more stable. I’d describe the response of my version as immediate, smooth, predictable, and very rewarding. I also enjoy the tricycle undercarriage as it seems to steer well on the ground and lessen the influence of a crosswind after touchdown. 


Specifications


Span: 52”

AUW ready to fly: 1.56kg

Balance point: 81mm from LE

Motor: 4-Max Professional Brushless Outrunner 3547, 960kv 

Prop: APC Electric 12x6

ESC: 4-Max 40A 

Battery: Overlander Sport LiPo 2200mAh 3S 35C XT60 connector 

Receiver: FrSky Archer R6 ACCESS

Transmitter: Taranis QX7 ACCESS, Open Tx

Rudder servo: EMAX ES3104 - 19g

Nosewheel servo: EMAX ES3104 - 19g

Elevator servo: JX 1109MG - 9g

Aileron servos: EMAX ES08MAII - 12g


Conclusion 


A self-build model nearly always provides enjoyment during construction, but you never know whether you’ll enjoy the flying until you try. This one definitely ticked both boxes. Overall, the project has been hugely satisfying and worthwhile - it seems that the original designers’ opening remarks were correct! 


Wednesday, July 28, 2010

FREE MODEL GLIDER PLAN: QUEEN BEE 8" Tiny glider

This is a conventional pod and boom design with V dihedral. A notable feature is the use of natural carbon fibre for the boom. Natural carbon fibre? Yes, I mean kebab skewers! These can be bought for peanuts (satay sauce?) from a supermarket or online for less than 2 pence each. Search through a pack and you may find a decent number that are straight, stiff and suitable for building with. Any hard outer skin on the cane should be positioned underneath the boom. The wonky ones can be used for, you guessed it, kebabs! Of course, if you cannot find real bamboo, please do feel free to substitute with carbon fibre instead.
For ease of construction, the wing has a straight high point. In the normal HLG manner, after the wing has been shaped, finished and cut, the ends are bevelled and glued into the correct V dihedral setting. A matching V is sanded carefully into the fuselage top - I make a tool for that using a coffee stirrer, balsa and Al-ox paper. Use epoxy for the dihedral joint and wing-fuselage junction. After the wing has set on the fuselage, you can cyano thread to the LE. It may act as a turbulator, but even if not, it protects the LE. I could not detect a change in performance after adding it. That said, if you leave the LE bare with no thread and it receives a bang or dent, then you can sponge it out with a tiny bit of water. It is really up to you.

The QUEEN BEE plan shows the original dayglow yellow and black stripe colour scheme. Finish in the same way as DOGEAR in the previous blogpost.

For some previous notes about flying this model click here. My "still air times" (as described in the DOGEAR blogpost) for QUEEN BEE were in the range ~28-30s.

FREE MODEL GLIDER PLAN: DOGEAR 6" Tiny glider

This is DOGEAR, a development of DOGCHEW (see previous blog post, again, just click and save the plan). DOGEAR differs mainly in the wing design. The planform is elliptical at the front with a basswood leading edge (or use lime wood which is also genus Tilia). Trailing edge is mostly straight with single taper near the tips. The wing is also thicker, 2.5mm (~5%) compared with the 1.6mm of DOGCHEW. By feel, I carefully sand a small "Phillips entry" under the LE, but the rest of the underside is flat. It is a typical HLG aerofoil. The wing is assembled as a straightforward three panel structure using epoxy at the breaks - the tips are raised by 15mm from the flat centre.

The three panel wing and the fact that dogs appear to find my models "tasty" were the reasons for the name DOGEAR.

Fuselage is laminated using pva (e.g. Titebond II). The thin glue layer increases stiffness and strength a great deal. A lighter way is to use spots of cyano. Alternatively, forget about the laminating completely and use hard 1/8 balsa instead. Please do feel free to experiment with nose length. In other words, cut it shorter if you wish. The size shown on the plan seemed work well in calmish conditions. I use epoxy for the wing fuselage joint and throw tab. Fin and stab should be sanded as thin as you dare, so that you can breathe and bend for trim.

My finish is the traditional 2 coats of thinned down sanding sealer with very fine Al-ox paper between coats. I finish the wing with sanding sealer before it is cut into three panels and the stab and fin before they are glued to the fuselage. A splash of dayglow colouring helps enormously for visibility. Apply Al-ox paper grips on the fuselage sides. In the photo below, you can see some inked stripes that also help to see the plane against the sky (er, I mean clouds, cos that's wot we av ere most in England).
By my reckoning, DOGEAR will stay up for about 5s longer than DOGCHEW in "still" air; by that I mean in very calm conditions outdoors early morning or late evening. I recorded consistent times of ~22-24s for DOGEAR in such conditions (I am sure a lighter version would do better).

Tuesday, July 27, 2010

FREE MODEL GLIDER PLAN: DOGCHEW 6" Tiny glider

The Small Flying Arts site has changed dramatically. I think they are in the process of transferring all the plans and articles over to the newly designed site. However, the plan and build notes for my DOGCHEW design are currently unavailable there. So I thought I'd publish them here. In future blogposts, I'll also publish some other tiny glider plans. Click and save the plan below. The build notes, which I wrote in 2006, are shown in full below the plan.


Build notes for DOGCHEW 6" glider

These notes accompany the plan for a simple 6" span free flight HLG. Small gliders do not have much momentum so tend not to break easily. Another advantage is that they can float on a whisper of lift. You get maximum fun with minimum fuss!

Now this is the first 6" glider of mine to fly over 30 seconds. When I was testing the prototype in a local park, there was nothing for me to do but laugh while I watched a "friendly" Dobermann Pinscher pick it up tenderly with its jaws, manouvre it about and then crunch it, very gently. I said to the dog-owner: "Well, I guess it looks a bit like a stick." He replied, "You’ll be needing a bit of glue then. A pity, cos it flew really well." I thought "yeah FLEW." At least the dog seemed to enjoy the flavour of dope on balsa. I spent the lonely walk home carefully spying the ground for other deeds by my new best mate Dobie….

That is why this design is called DOGCHEW. Its best flight so far is about 63 seconds and still air time around 18 seconds. In the 2006 Tiny Gliders postal contest (see http://www.windandwavemodels.com), average flight time was about 32 seconds.

It is a straightforward build. The plan is to scale, so you may find it easiest to use a photocopier or scanner to enlarge or reduce it in accordance with the fuselage dimensions.

Instead of laminating the fuse with PVA, you can use spots of CA – this is lighter. Alternatively, forget about the laminating completely and use hard 1/8 balsa instead. The wing is made in the usual HLG way. Make a template from the plan. Use it to cut out the whole wing planform, sand in the airfoil with the high point as per the dotted line and apply 2 coats of sanding sealer. Then cut the wing in half, sand the dihedral angle at the root chord and glue together with epoxy. Sand a “v” in the fuse for a wing seat and use epoxy here and for the throw tab. Fin and stab should be sanded as thin as you dare, so that you can breathe and bend for trim. (The prototype had trim tabs, but these were dropped in the final design because they were easy to break). Apply sandpaper or similar for grips on the side of the fuselage.

Feel free to play around with the length of the nose – e.g. chop it shorter if you like. The length shown on the plan seems to work well in calm conditions. Also, you may find it beneficial to sand a bit of washout under the starboard wing tip TE.

Using gentle glides from the shoulder, trim for a left turn, with a slightly “stally” glide. Full power throws are to the right of the wind with a slight right bank. As with most HLGs, avoid throwing with less than full power! Add left rudder if it stalls in the glide, but not too much otherwise it will spiral dive. When properly trimmed, it should transition at the top quickly and start turning nice flat left circles.

Thermal in peace….. :)

Berkshire, U.K., 2006

Tuesday, August 18, 2009

Albert Hatfull: The Senator, Junior 60 and much, much more!


Albert Edward Hatfull ought to be more famous.

At free flight events in the UK (and around the world) you are likely to see a SENATOR rubber model soar up into the sky for yet another flight over 3 minutes. I never tire of watching the SENATOR. It may well be the most successful rubber model that has ever been sold in kit form (by Keil Kraft). To demonstrate what I mean, here is a great video of a SENATOR being trimmed on a short motor run by US modeller Almico123:


Isn't that superb?!

Many RC afficianados will know and love the Junior 60 design. Originally a free flight "gasser", you'll still see Junior 60s being used by radio control clubs as "workhorses" and camera platforms. It is charming and possesses a functional attractiveness that is difficult to explain to non-modellers. See this fabulous article on an electric conversion by Barry Slater.

The plans for these iconic designs are as beautiful as the models themselves. The SENATOR and JUNIOR 60 were just two of the many models designed by Albert Edward Hatfull. The plans were drawn by him while he was engaged by Keil Kraft as a young man.

Albert was born in 1926 in London. His family had a strong engineering and sea-faring tradition. However, he was into aeroplanes and from the age of 9 he cut his teeth on Megow and Guillow's kits. By all accounts he was a colourful character with a great sense of humour. He was fond of New Orleans jazz, followed the US model aircraft scene (Korda et al) and played the piano. He attended Tottenham Technical College, studied maths and draughtsmanship and developed an interest in aerodynamics. Sadly in 1942 at the tender age of 16, he contracted polio from a local swimming pool. This was a time when vaccination was not yet available. The disease restricted his hand mobility, but the wonderful thing is that he did not let it stop him from being creative.

Soon after the polio infection, the youthful designer created his first model for Keil Kraft. As it was wartime, he named it the INVADER glider and it became a best-seller. Before the age of 20, the JUNIOR 60 was created, quite literally "while the V2s were falling on London". Despite the polio, he built a career as a proficient draughtsman. Engineering drawings and later patent work at the Science Library provided a living, but model aircraft were his passion. He designed dozens of planes, including the SENATOR in ca. 1950 and the SKYSCRAPER around the same time. The two models are very similar, the main difference being an undercambered fuselage on the SKYSCRAPER. Albert was clearly interested in aerofoil shaped "lifting" fuselage profiles. Interestingly, he did not report any difference in the performance of the SENATOR as compared to the SKYSCRAPER and the former became much better known, widely flown.

Apart from gliders (e.g. SOARER series) and rubber power jobs, he also designed many Jetex models. Of the jet designs, his personal favourite was the De Havilland VENOM. Many of his plans were published in the aeromodelling press. He even designed Keil Kraft's triangular trade mark logo!

After Keil Kraft, he did some design work for Worcraft models (Dewsbury) and Elite models (Manchester). These included the Worcraft SCARAB - with lovely elliptical wing profiles and the Elite ELF, which like the SKYSCRAPER, sported a beautiful aerofoil shaped "lifting" fuselage profile. Ill health forced him into retirement in 1984 and he passed away in 2007.

I hope this blog post helps to make Albert E. Hatfull's name as famous as his models. Aeromodellers will not forget him!

(I hope to continue researching and will endeavour to expand this blog post accordingly. For example, I wonder if someone has a good list of all his models - if you do, please email me!).

References

1. Harry Payling (2007), Obituary of Albert Edward Hatfull, New Clarion SAM 1066 newsletter, November 2007, p.20-21.

2. Bill Morley (1996), SAM meets Albert, SAM 35 Yearbook 9 , p.2-7.

3. Andrew Longhurst (1995), Rubber Column No.149, SAM Speaks No.155 June 1995, p.3, 5-6.


Sunday, February 15, 2009

FREE MODEL GLIDER PLAN! Tiny glider, 8 inch Catapult Launched Glider (CLG)

If you downloaded this plan before 28 February 2009, please discard that copy and use this version instead - some important details were either wrong or missing Sorry!

As you can see from earlier blog posts, I've been playing with Charlie Sotich's simple 8" CLG. Necessity really, after the original 1/32 thin wings - as per his plan - shredded on launch.


So here is my "re-mix" of his design. Main changes are conventional HLG style wing, three panel instead of V-dihedral, a slightly longer nose and some mods for a stronger wing fuselage joint.

Sotich named many of his designs [SOMETHING] DIP. For example, his famous 48" glider was called LIL DIP. Since this 8 incher is intended for the Tiny Gliders postal event, I called it the TINY DIP, but I don't know whether he ever made a design with that name.

I hope you enjoy the plan - drawn with a smile on my face and a bit of tongue in cheek. An easy build, lots of fun, pretty in the air and satisfying performance (right click on the plan and select Save Image As). Try a 3/16" rubber loop for the catty. You can use kevlar tow instead of CF. Fix to the model's balsa sides with CA glue. Note the washout on both tips and the washin triangular wedge on the left wing only. There is a slight incidence (decalage) in the design. I visualise it as the bottom of the fuselage being horizontal, and the top line of the fuselage a slope, taller at the front. The closer you get to 0-0, the straighter and higher the launch, but stability decreases. Too much decalage, then the climb becomes a height-sapping spiral (or worse, gets loopy).

Photo below of the TINY DIP glider (4.1g ready to fly).


Sunday, February 8, 2009

Source of Vintage (Old Timer) Plans and Articles


There's an excellent new source of information on "vintage" model gliders and free flight aircraft. The POPULAR SCIENCE magazine series has been digitized and is now available on the internet via Google Book Search.


Screen shot of an article by Frank Zaic on the THERMAL HUNTER rubber model is shown left. It also includes building instructions, tips and drawings.


I had a look through some issues for articles and this is just a selection of the gems that I found:
  1. New Thermal Hunter Plane Model, Frank Zaic, August 1936, p60
  2. International Contest Flyer, Frank Zaic, June 1940, p150
  3. Model Fuselage Building, Edwin T Hamilton, July 1931, p110
  4. Give your model the right propeller, Edwin T Hamilton, July 1930 p96
  5. From ten parts you can build twenty model planes, Edwin T Hamilton, August 1931, p72
  6. Model-Airplane Short Cuts, Frank Zaic, September 1941, p170
  7. Test Flying Model Airplanes, Frank Zaic, June 1942, p196
  8. Gas Models and Towline Gliders, Frank Zaic, September 1942, p.HW230
  9. Novel Inventions aid Model-Plane Champions [no author indicated] November 1939, p67
  10. The modern 300 incher, Zaic, Aug 1942, p.HW174
  11. Hints that will help you build airplane models, Edwin T Hamilton, January 1931, p116
  12. Miss Science (gas model), Frank Zaic, September 1939, p142
Happy reading!

Tuesday, December 2, 2008

Model Glider Plans

If you're looking for really interesting A/2 glider plans, then the January 2007 issue of New Clarion is a great resource. It contains fabulous information on a number of, shall we say, "nostalgic" glider designs. A/2 gliders are basically the big ones - usually between 60 and 79 inch span (~ 2m). SAM 1066 is a UK based chapter of the Society of Antique Modellers - well worth a visit and their membership is free!

Converting a free flight glider to radio control RC

Free Flight gliders could be useful starting points for an RC conversion - to make a really high performance radio control glider. To flesh this out, here's an example of enlarging a Keil Kraft Soarer and converting it to RC (discussed on the
RC Groups forum) :


And here's a super example of an RC conversion of the Lulu (50" free flight glider, discussed on the SFA forum, by my friend Eagleone):


I would suggest that neither the Soarer nor the Lulu is in the same league as the big A/2 gliders. Indeed, I daresay that converting one of those "biggy" free flight A/2 designs to RC would create a very high performance radio control sailplane.

If only I had the time to try it....

Thursday, October 23, 2008

P-51D Mustang - Sport Scale Rubber Model

The P-51D Mustang is a very popular model aeroplane subject - and for good reason. The sight and sound of one in flight is just as iconic and neck-tingling as the Spitfire. The P-51D is recognisable by its teardrop bubble canopy, fin gusset (although not every D model has one) and distinctive "kink" in the wing LE near the root.

www.mustangsmustangs.com is a superb resource for information on these amazing planes. They served in air forces all over the world.

For some time, I've been wanting to build Dick Baxter's 14.5" sport scale rubber power design, plans for which are available at
SFA. You can see the relationship of this design to his Akro model. It's a fairly simple to build rubber model that can be flown outdoors or with care indoors. All you really need are some 1/16" square spars, a bit of 1/16 sheet and a 1/8 square spar. Clearly, he has tried to avoid tricky building and curves while at the same time, creating a fair impression of the full-size plane. It seems like a well thought out design.


I started off with the canopy. This is the first time I've ever tried to hot-stretch canopies out of discarded packaging plastic. It's great fun!

Airframe is fairly easy to build, though a bit fiddly. Here are the wings.


More pictures to follow.

Monday, March 10, 2008

DLG Plan: Part 1, Design thoughts

"The time has come," the Walrus said, "to build a DLG:
Of wings - and fins - and carbon booms -
Of glass fibre - and pins -
And why the sky is bubbling -
And whether pigs have wings."

It is time for me to build such a pig. First question, shall I use an established plan or kit, like Spin Up, Round-A-Bout, Dynamo Hum, Turn Up, or other? Erm....No. Why? Because I wanna make my own! I enjoy designing. I cannot do better than the established designs. No, my objectives are different. I see this as a learning experience. I'm not going to ignore the exisiting designs. I'd like to create a free flight tip-launched glider that has the following attributes:
                • Simple design
                • Quick and easy to build
                • Pleasant looking
So, ladies and gentlemen, I present to you LIPZOID, well, a back-of-an-envelope sketch of it.

DESIGN THOUGHTS

The original Monster DLG by Tetsuo Itoh in 2004 had 8 panel wings. Phew! At that time, it was the fashion in conventional "javelin" style launching HLGs to have multi panel polyhedral wings (5 or more panels). A few months ago, Tim Batiuk smashed the US HLG record with his 4 panel design, Turn Up. His plan is freely available at Kurt Krempetz' excellent
AMA Glider website. If I was sensible, I'd make a Turn Up (er, affectionately, "Turnip"). It has a 4.5" root chord, four wing panels and is not my own design! Maybe later.

I have 4" wide 6mm balsa in stock and want to try to make a three panel free flight DLG. 4x36 worked on Dynamo Hum, Twirly Bird and the Monster was close to that size. Three panels works for the Gambler RC DLG. Most F3K designs are simple dihedral (though of course, they have aileron servos!). There is long history in 3 panel wings in Free Flight, such as the iconic, super-performing Keil Kraft Senator rubber model, many F1A glider designs and quite a few conventional HLGs. So why not a FF DLG in 4x36 three panel? The wing can be glued up in one session and the wing root fuselage joint is a simple butt joint (no need to sand a v in the fuselage). So time can be spent instead on that lovely glass fibre cloth stuff. Fewer joints means lighter weight too.

For a bit of style, and because capriciously, I'd like to call the model LIPZOID, I decided to utilise ellipses for all flying surface planforms. My excuse is that ellipse planforms have a long history in free flight, especially in HLGs. They are also easy to print on a pc! None of this fancy drawing package nonsense, no. I use old-fashioned PowerPoint. I'll use ply biscuit(s?) and GF cloth on wings, no CF tow. It must have bass wood or spruce on LEs (thread may be ok on the tail feathers). Fuselage from 6mm balsa reinforced with GF, spruce or bass and ply, aiming for light weight and simplicity. Probably a nylon bolt for the boom pivot. Button timer and probably 2 different thicknesses of fishing pole elastic to hold the boom yet create appropriate tension on the timer arm. No throwing peg - just sandpaper top and bottom - just like Mr Batiuk.

Will it fly? Who knows? But I'm gonna enjoy finding out!

Thursday, February 14, 2008

Polish Aircraft - Superb Scale Subjects

I've been a fan of Polish planes ever since I watched a full-size Ogar (SZD-45) taking off at an airfield. This is a motor glider designed in the 1970s and is simply hypnotic to watch. No wonder they issued a stamp picturing it (left).

After I had the fortune to fly in other Polish gliders, such as the SZD Junior and Puchacz, I was hooked. They were well made and handled superbly. The SZD-55 is to my mind one of the most beautiful gliders ever.


Now here is a fabulous Polish movie, probably from the early to mid 1960s. It seems to be about wave soaring in the mountains. You need to put the sound on, because the music (Moon River) adds to the effect. Watch out for the footage of an SZD-22 Mucha Standard glider, a model sailplane (at 3:50 minutes in), the Mucha Std being aerotowed by a Gawron (4:40 to 6:30) and the super streamlined SZD-24 Foka glider (8:25).


The Polish aviation industry has a track record of coming up with amazing, ground-breaking and eye-catching designs. PZL means "state aviation works" and no doubt, early on the industry was heavily state funded. After SOLIDARITY and the rise of capitalism, it seems that some of the aviation industry was bought by the European aviation giant EADS. I have never fully understood how the industry is structured and organised. Currently, there seem to be at least two glider manufacturers - PZL Swidnik (who make the PW5 and PW6) and SZD Allstar PZL Sp. z.o.o. (who have a long history in sailplane manufacture).

In the early 1930s, arguably the best fighter plane in the world was the PZL P.11 (photo right). It had these amazing parasol, gull wings. It is not difficult to see why it is a subject for scale modellers, though perhaps not common enough. At that time, the pace of aeroplane development especially in Germany, was very fast and the performance of the P.11 was soon surpassed.


The PZL 101 Gawron was designed in the late 1950s/early 1960s for agricultural and other civilian uses. (Photo left; the tug plane in the video above is one of these). I have not seen a free flight model of it, but it would make a fine subject with those wing tip plates and slightly swept back wings.


The PZL 104 Wilga (left and below) is a fairly common subject for RC models - both scale and semi-scale. With its slightly quirky but cute looks and short take off run, it would make a great rubber or electric free flight model. It makes a good glider tug, full-size and I suppose, as a model.


The PZL 130 Orlik (below) is a very small, ~10m span, 2 seater, highly versatile training plane. It is used by many air forces and the Polish Air Force display team.


The wing planform and the proportions are fabulous (see the three-view below). This would make a lovely model plane.


Unsurprisingly, Poland has produced some fine pilots and aeromodellers too.
Google